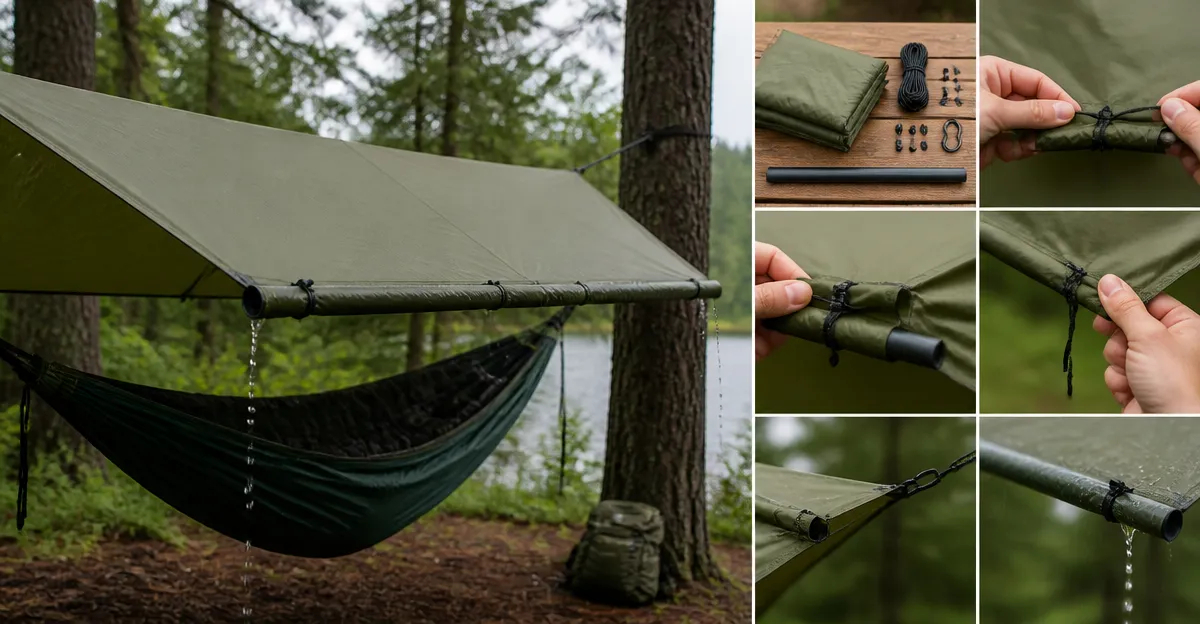
How to Build a DIY Hammock Tarp Gutter System: Step‑by‑Step Guide to Keep Your Hammock Dry
Introduction
Outdoor enthusiasts often encounter unexpected rain while enjoying a hammock. A well‑designed gutter system attached to a tarp can channel water away from the sleeping area, ensuring comfort and protection. This guide explains how to construct a functional gutter system using readily available materials and recommended Amazon products. Readers will learn how to assess the campsite, select appropriate tarp components, fabricate gutter channels, and integrate the system with a hammock setup. The result is a reliable shelter that performs in diverse weather conditions.
Although the guide focuses on a DIY solution, each step includes optional product recommendations that simplify the process. The recommended items are chosen for durability, weight, and ease of use, allowing both novice and experienced campers to achieve professional‑grade results without excessive cost.
By following the instructions, one will be able to enjoy dry nights under a hammock even during heavy downpours, while maintaining a lightweight pack profile suitable for backpacking trips.
What You’ll Need
- A waterproof hammock rain fly (e.g., Pro Venture Hammock Rain Fly)
- Aluminum or titanium stakes (included with many rain flies)
- Adjustable guy lines (often supplied with rain flies)
- Durable gutter material – lightweight aluminum channel or reinforced PVC strip
- Heavy‑duty zip ties or cordage for attachment
- Scissors or utility knife
- Measuring tape
- Silnylon repair tape (optional for sealing seams)
All of the above items are commonly found in a backpacking gear kit. The rain fly serves as the primary shelter, while the gutter material redirects runoff away from the hammock interior.
Step 1: Assess the Camping Site
The first step is to evaluate the location where the hammock will be strung. Identify two sturdy anchor points, such as trees or posts, that are at least 10 feet apart. Measure the vertical clearance to ensure sufficient height for a rain fly with an attached gutter. Check the ground slope; a slight downward angle away from the hammock will aid water drainage.
During assessment, note the prevailing wind direction. Positioning the gutter on the leeward side of the tarp maximizes its effectiveness, as wind‑driven rain tends to accumulate on that side. Document the measurements because they will guide the cutting of gutter channels to the correct length.
While this step does not require any specific product, using a Wise Owl Hammock Rain Fly as a reference tarp can help visualize the optimal layout. The Wise Owl model measures 11 ft × 9 ft and includes six 10‑foot guy lines, making it easy to experiment with different orientations before final installation.
Step 2: Choose the Appropriate Rain Fly
Select a rain fly that offers ample coverage, sturdy attachment points, and a weight that matches the backpacking style. The Pro Venture Hammock Rain Fly provides a 12 ft × 9 ft hexagonal shape, six reinforced grommets, and six 3‑meter guy lines with tensioners. At $29.99 and a rating of 4.6 / 5.0 from 782 reviews, it balances affordability with durability.
For hikers who prioritize ultralight gear, the onewind Hammock Tarp with Doors offers a 12 ft × 10 ft footprint, weighs 1.8 lb, and includes a door system for additional weather protection. Priced at $92.99 with a 4.7 / 5.0 rating from 785 reviews, it is ideal for four‑season use.
Each rain fly includes built‑in stakes and guy lines, reducing the need for separate purchases. However, the gutter system will require additional attachment hardware, which is addressed in the following steps.
Step 3: Fabricate the Gutter Channels
Gutter channels can be created from lightweight aluminum rain‑gutter sections (1‑inch wide) or reinforced PVC strips. Cut the material to match the length of the rain fly’s longest side, typically the 12‑foot dimension. Ensure the cut ends are smooth to prevent tearing of the tarp fabric.
Next, bend the channel into a shallow “U” shape if using flat strip material. This shape creates a channel that captures water and directs it toward the lower end. For aluminum sections, a simple bend with a pair of pliers is sufficient.
Attach a short length of cord or zip tie to the lower end of each gutter to serve as a drainage hook. This hook can be secured to a low‑lying stake or a tree branch, allowing water to flow away from the hammock without pooling.
When fabricating gutters, consider the weight of the material. Aluminum adds minimal weight (approximately 0.2 lb per foot) and resists corrosion, making it a superior choice for long‑term use compared with heavier steel alternatives.
Step 4: Secure the Gutter to the Rain Fly
Position the rain fly on a flat surface with the side that will face the prevailing wind facing upward. Align the gutter channel along the edge of the tarp where water is most likely to collect. Use the reinforced grommets or reinforced stitching points to attach the gutter with zip ties or strong cordage.
For the Pro Venture Hammock Rain Fly, the six grommets provide ideal anchor points. Loop a zip tie through a grommet, then through the top edge of the gutter, and tighten securely. Repeat every 12‑18 inches to ensure even distribution of load and prevent the gutter from sagging.
If the selected rain fly includes reflective paracord (as the Pro Venture model does), using the same cord for gutter attachment maintains a consistent aesthetic and reduces the number of different cords carried.
After securing the gutter, test its flexibility by gently pulling on the tarp. The gutter should remain firmly attached while allowing the tarp to fold flat for packing.
Step 5: Install the Rain Fly and Gutter System Over the Hammock
Hang the hammock between the two anchor points using hammock straps or webbing. Ensure the hammock is level and taut. Next, drape the rain fly over the hammock, aligning the gutter on the leeward side. Use the included guy lines to tension the tarp, pulling them tight and anchoring them with the supplied aluminum stakes.
Adjust the height of the tarp so that the gutter sits a few inches above the hammock’s sleeping surface. This clearance prevents water from dripping directly onto the user while still allowing the gutter to capture runoff.
Secure the lower end of the gutter to a ground stake or a low branch using the drainage hook installed in Step 3. Verify that water flows freely toward the hook and away from the hammock. If necessary, add an additional stake to create a gentle downhill path for the water.
For users of the onewind Hammock Tarp with Doors, the built‑in doors can be closed to create an enclosed chamber, further reducing wind‑driven rain. The doors also provide an extra layer of insulation during cold weather.
Step 6: Test and Fine‑Tune the System
Before settling in for the night, simulate rain by gently pouring water over the tarp. Observe the flow of water through the gutter and ensure it does not spill onto the hammock. Adjust the tension of the guy lines and the angle of the gutter if water pools at any point.
Check that the stakes are firmly embedded in the ground. Loose stakes can cause the gutter to shift, compromising its ability to divert water. If the campsite has soft soil, consider using a larger stake or a dead‑man anchor for added stability.
Finally, verify that the hammock remains comfortable and that the added weight of the gutter does not significantly alter the hammock’s swing. The gutter system typically adds less than 0.5 lb to the overall setup, preserving the lightweight nature of the hammock configuration.
Tips & Pro Tips
- Use a tarp with reinforced stitching or double‑layered seams to prevent water ingress at high tension points.
- When camping in windy conditions, orient the gutter on the side opposite the wind to reduce flapping.
- Apply silnylon repair tape to any small holes in the tarp before installing the gutter; this prevents leaks that could bypass the gutter system.
- Carry a small spare set of zip ties; they are inexpensive and essential for quick repairs.
- Consider adding a reflective strip to the lower edge of the gutter to improve visibility at night.
Troubleshooting
Problem: Water pools at the top of the gutter and drips onto the hammock.
Solution: Increase the slope of the gutter by raising the high side with an additional stake or by adjusting the tension of the upper guy lines.
Problem: Gutter detaches during strong wind.
Solution: Reinforce attachment points with extra zip ties or replace zip ties with durable paracord knots. Ensure the stakes are driven deep enough to resist wind uplift.
Problem: The tarp sags excessively, reducing headroom.
Solution: Add extra guy lines to the corners of the tarp and tension them toward higher anchor points. This will raise the center of the tarp and improve clearance.
Conclusion
Constructing a DIY hammock tarp gutter system enables outdoor enthusiasts to stay dry during unexpected rain while preserving the lightweight nature of a hammock setup. By assessing the site, selecting a suitable rain fly, fabricating and attaching a simple gutter channel, and testing the configuration, one can achieve a reliable shelter that performs in a variety of weather conditions. The recommended products—such as the Pro Venture Hammock Rain Fly, onewind Hammock Tarp with Doors, and Wise Owl Hammock Rain Fly—provide durable, lightweight, and affordable options for the core components of the system. With careful installation and regular maintenance, the gutter system will extend the comfort and usability of a hammock for countless camping adventures.
Products Mentioned in This Guide
Frequently Asked Questions
What is a hammock tarp gutter system and why should I use it?
It’s a set of channels attached to a tarp that directs rain away from the hammock, keeping you dry and comfortable during wet weather.
What basic materials are needed to build a DIY hammock tarp gutter system?
You’ll need a waterproof tarp, lightweight aluminum or PVC tubing, zip ties or cord, and optional waterproof tape or sealant.
How do I shape and attach the gutter channels to the tarp?
Cut the tubing to match the tarp’s edge, bend it into a shallow “U” shape, then secure it with zip ties or cord along the tarp’s perimeter, sealing seams if needed.
Can the gutter system be installed on any hammock setup?
Yes, as long as the tarp fits over your hammock’s suspension points, the gutter system can be adapted to most hammock configurations.
Will adding a gutter system significantly increase the weight or bulk of my pack?
When using lightweight tubing and minimal hardware, the added weight is usually under 200 g and packs flat, preserving backpacking efficiency.