How to Modify a Hammock Tarp for Better Airflow: 7 Easy DIY Ventilation Upgrades to Reduce Condensation
Introduction
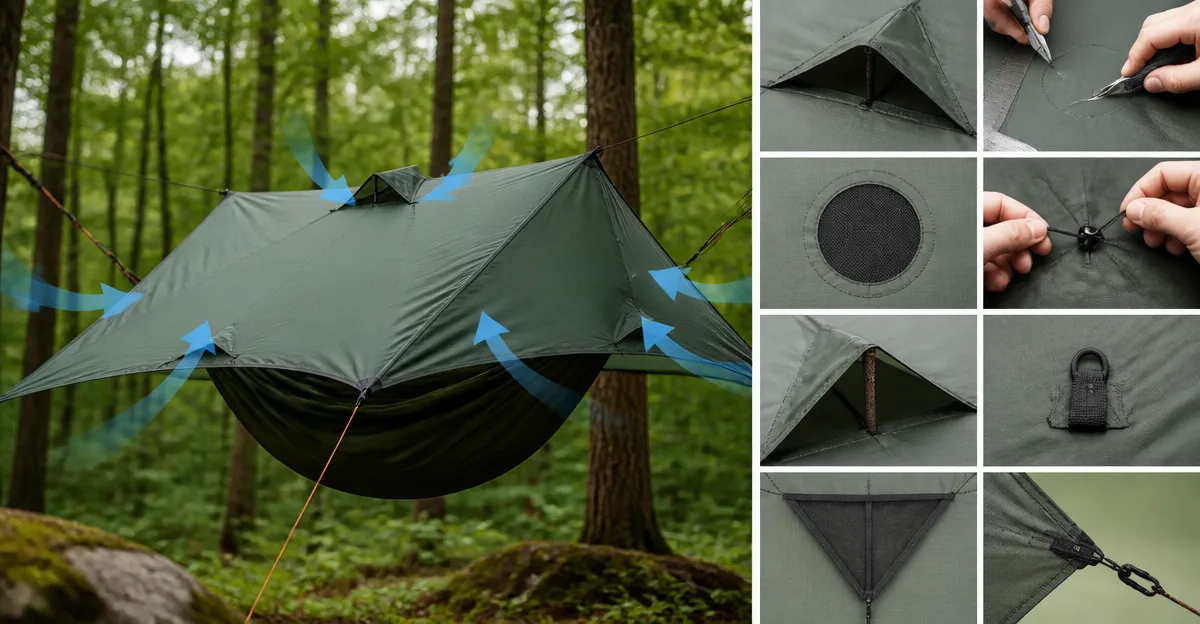
The reader will learn how to increase ventilation in a hammock tarp, thereby reducing the amount of condensation that forms during night time use. Condensation occurs when warm, moist air inside the tarp meets a cooler surface, creating water droplets that can soak sleeping gear. By applying seven straightforward modifications, one can improve air exchange while preserving the tarp's waterproof performance. This guide balances accessibility with depth, providing clear instructions, product recommendations, and practical tips for intermediate outdoor enthusiasts.
What You’ll Need
- One Wise Owl Hammock Rain Fly (or a comparable tarp of similar size)
- Lightweight aluminum stakes (included with most tarps) or spare stakes for reinforcement
- Adjustable guy‑lines or cordage (silnylon or Dyneema for durability)
- Small scissors, a seam ripper, and a fabric‑friendly waterproof sealant
- Optional: onewind 12x10 Hammock Tarp for testing alternative vent designs
Step 1 – Assess Existing Ventilation
Begin by examining the current tarp for built‑in vents, seams, and tie‑out points. The Wise Owl Hammock Rain Fly measures 11 ft × 9 ft, weighs 18.9 oz, and includes six 10‑foot guy lines and aluminum stakes, providing a solid foundation for modification. Identify any existing openings, such as the reflective guy‑line loops, and note where moisture tends to accumulate. Understanding the tarp’s baseline airflow will guide the placement of additional vents and ensure that new openings do not compromise waterproof seams.
Step 2 – Create Adjustable Roof Vents
Cut two rectangular vents near the center ridge line, each approximately 4 inches wide and 6 inches tall. Use a sharp scissors to make clean cuts, then reinforce the edges with a waterproof sealant to prevent fraying. Attach a loop of cordage to each vent opening, allowing the vent to be opened or closed with a simple knot. This adjustable system enables the camper to increase airflow on warm nights while sealing the vent during rain. The Unigear Hammock Rain Fly employs similar reinforced tie‑outs, demonstrating the durability of this approach.
Step 3 – Install Side Flaps with Over‑Lap
Side flaps increase cross‑ventilation without sacrificing shelter from wind. Cut two 6‑inch wide strips along the lower edge of each side panel, then fold them outward and secure with lightweight snaps or buckles. Over‑lapping the flaps when the tarp is pitched creates a channel for air to flow while still blocking direct rain. The Gold Armour Rain Fly includes 33 tie‑down loops, illustrating how multiple anchoring points can support complex shapes without adding excessive weight. By mimicking this design, one can achieve a balanced airflow system.
Step 4 – Add a Mesh Window
For a permanent ventilation solution, sew a small window of fine mesh fabric into one side panel. The mesh should be no larger than 6 × 8 inches to prevent insect intrusion while allowing air to pass. Use a waterproof seam tape to seal the edges of the mesh to the tarp material. The mesh window acts as a passive vent that remains open regardless of weather, reducing the need for manual adjustments. This technique is compatible with the 3000 mm waterproof rating of the Wise Owl tarp, ensuring that rain is still deflected away from the interior.
Step 5 – Utilize a Dual‑Layer Ridge Line
Install a secondary ridge line made from thin, low‑stretch cord beneath the primary ridge. This secondary line creates a slight gap between the tarp and the hammock, encouraging warm air to rise and escape. Tie the secondary line to the existing tie‑out points using the provided aluminum stakes for stability. The onewind 12x10 Hammock Tarp features an overlapping door system that creates a similar air channel, proving the efficacy of dual‑layer designs for condensation control.
Step 6 – Optimize Guy‑Line Tension
Improperly tensioned guy lines can cause the tarp to sag, trapping humid air against the hammock. Adjust each of the six 10‑foot guy lines on the Wise Owl tarp so that the roof is taut and the side panels are slightly angled upward. Use the included aluminum stakes and cordage adjusters to fine‑tune tension without over‑tightening, which could tear the ripstop nylon. Proper tension creates a steeper roof pitch, allowing warm air to flow upward and out of the vent openings.
Step 7 – Test and Refine the System
After completing the modifications, set up the tarp in a controlled environment and simulate night‑time conditions by breathing inside the shelter for several minutes. Observe the rate at which condensation forms on the interior surface. If moisture persists, open the roof vents wider or add an additional side flap. The Bear Butt Hammock Rain Fly, priced at $24.97 with a 4.6‑star rating, demonstrates that even a lightweight, ultralight tarp can benefit from simple vent adjustments. Continuous testing ensures that the final configuration delivers optimal airflow while maintaining waterproof protection.
Tips & Pro Tips
- Use reflective cordage on vent loops to locate them easily in low‑light conditions.
- When camping in windy environments, angle side flaps toward the prevailing wind to maximize ventilation without compromising shelter.
- Apply a thin layer of silicone‑based waterproof sealant to all newly cut edges to preserve the tarp’s hydrostatic head rating.
- Consider adding a small zippered pocket to store a lightweight rain cover for the vents during heavy storms.
Troubleshooting
Problem: Condensation continues despite open vents.
Solution: Verify that the ridge line is taut and that the side flaps are not obstructed by nearby foliage. Increase the size of the mesh window or add a second vent on the opposite side to improve cross‑ventilation.
Problem: Rain leaks through newly cut vents.
Solution: Re‑apply waterproof sealant to the vent edges and ensure that the vent loops are fully closed during precipitation.
Conclusion
By following the seven steps outlined above, the reader can transform a standard hammock tarp into a high‑performance shelter with superior airflow and reduced condensation. The modifications are inexpensive, reversible, and compatible with a wide range of tarps, including the Wise Owl Hammock Rain Fly, onewind 12x10 Hammock Tarp, Unigear Hammock Rain Fly, Gold Armour Rain Fly, and Bear Butt Hammock Rain Fly. Implementing these upgrades will enhance comfort, extend gear lifespan, and enable more enjoyable overnight adventures.
Products Mentioned in This Guide
Frequently Asked Questions
Why does condensation form inside a hammock tarp and how can ventilation help?
Condensation occurs when warm, moist air inside the tarp meets a cooler surface, causing water droplets; increasing airflow lets the humid air escape, reducing moisture buildup.
What are the simplest DIY modifications to improve tarp airflow?
Add vent windows, cut small mesh panels, install adjustable guy‑lines to create gaps, and use breathable sealant around seams.
Can I add vents without compromising the tarp’s waterproof rating?
Yes, using waterproof, breathable mesh or sealing vent edges with a waterproof sealant maintains water resistance while allowing air exchange.
What type of cordage is best for securing ventilation upgrades?
Silnylon or Dyneema cordage is ideal because it’s lightweight, strong, and resistant to UV and moisture.
How do I prevent rain from entering through the new ventilation openings?
Position vents on the leeward side, use overlapping flaps, and seal the edges with a flexible waterproof sealant to keep rain out while still permitting airflow.