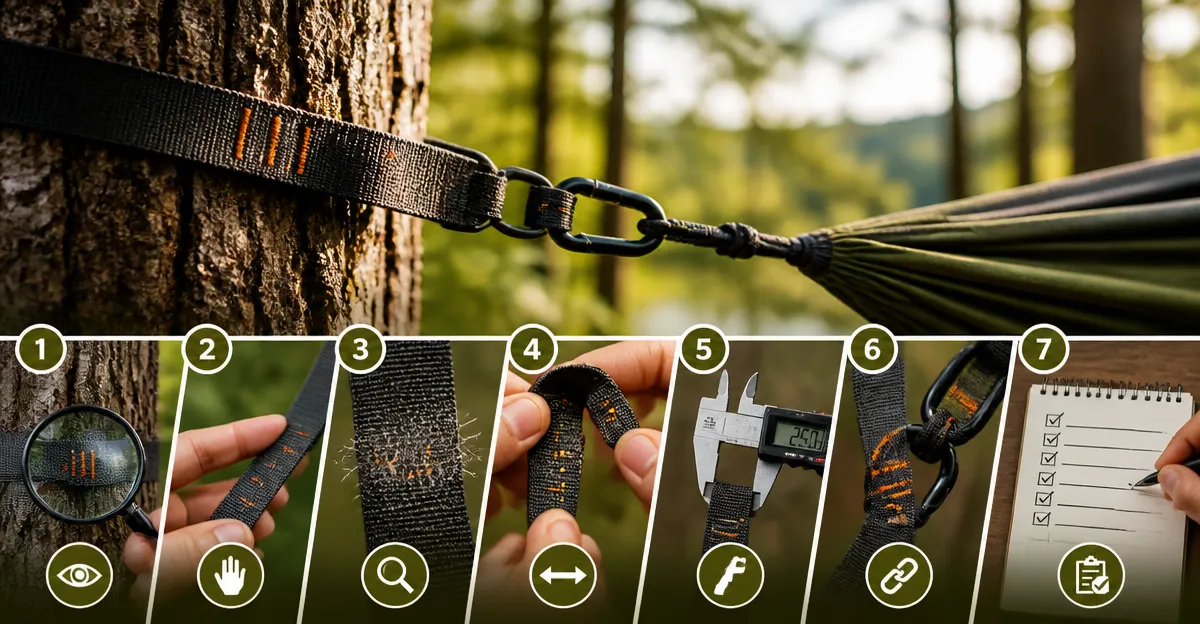
How to Predict Hammock Suspension Wear Patterns: 7 Inspection Steps to Spot Damage, Prevent Failure, and Extend Lifespan
Introduction
Anyone who enjoys hammock camping knows that a reliable suspension system is the foundation of safety and comfort. This guide will teach readers how to anticipate wear patterns before they become hazardous, using systematic visual and functional checks. By mastering these seven steps, one can prevent sudden strap failure, protect beloved trees, and ultimately extend the usable life of hammock suspension gear.
The instructions are written for intermediate outdoor enthusiasts who already own a hammock and basic accessories. While the guide references specific Amazon products, the methods remain valuable even without purchasing new equipment. Each step includes a brief rationale, actionable instructions, and recommendations for tools that simplify the inspection process.
What You’ll Need
- A clean, well‑lit workspace (a campsite table or a garage bench).
- A soft brush or lint‑free cloth for removing debris.
- A lightweight scale or a sturdy backpack to apply a test load.
- Optional but helpful: ENO Atlas Suspension Straps, SZHLUX Hammock Straps, MalloMe Hammock Straps, Foxelli XL Hammock Straps, and ENO Atlas XL Suspension Straps.
Step 1 – Conduct a Thorough Visual Inspection of the Straps
The first step is to lay each suspension strap flat on a clean surface and examine the entire length for abrasion, cuts, or discoloration. Look especially at the areas where loops intersect, as friction is highest there. Any visible fraying or thinning indicates that the material is losing its integrity.
For a benchmark comparison, the ENO Atlas Suspension Straps provide a reference point because they are made from 9 oz polyester webbing rated for 400 lb. Their 30 attachment points and tree‑friendly width help you understand what a well‑maintained strap should look like. Price: $29.95, Rating: 4.9/5 (3,580 reviews).
When you spot a defect, mark the location with a small piece of colored tape. This will aid later steps that focus on load testing and loop integrity.
Step 2 – Verify the Condition of Attachment Points and Carabiners
Attachment loops, daisy‑chain links, and any included carabiners must be free of rust, deformation, or cracked stitching. Gently pull each loop to feel for stiffness that could indicate hidden wear.
The SZHLUX Hammock Straps come with two reinforced carabiners and 38 loops per strap, making them an ideal tool for this check. Their heavy‑duty polyester construction tolerates over 2,000 lb, providing confidence that the loops are robust. Price: $9.99, Rating: 4.7/5 (641 reviews).
If a loop feels brittle or a carabiner shows signs of wear, replace that component immediately to avoid a cascading failure during use.
Step 3 – Perform a Controlled Load Test
After visual confirmation, apply a gradual load to each strap to simulate real‑world tension. Place a backpack filled with weight or use a portable scale, then increase the load in 10‑lb increments until you reach 75 % of the strap’s rated capacity.
The MalloMe Hammock Straps are rated for 2,000 lb total and include locking carabiners, which allow you to secure the test weight safely. Their 40 attachment loops give you flexibility to test different tension angles. Price: $17.99, Rating: 4.8/5 (10,688 reviews).
Observe any stretching, slipping, or audible creaking. If the strap elongates beyond a few millimeters, the internal fibers may be compromised and the strap should be retired.
Step 4 – Assess Tree Contact and Width of the Strap
Tree‑friendly designs distribute pressure across a larger bark surface, reducing damage to both the tree and the strap. Measure the strap width at the contact points; a minimum of 1.5 inches is recommended for most hardwoods.
The Foxelli XL Hammock Straps are 20 ft combined, feature 40+2 loops, and are constructed from high‑density, no‑stretch polyester. Their extra length and generous width make them excellent for checking how well a strap spreads load on varied tree diameters. Price: $11.97, Rating: 4.8/5 (7,590 reviews).
When the strap leaves narrow imprint lines on the bark, consider adding a protective sleeve or switching to a wider strap to preserve both the tree and the suspension system.
Step 5 – Examine Stitching Quality and Loop Integrity
Stitching is the weakest link in most suspension systems. Use a magnifying glass to inspect each seam for broken threads, uneven spacing, or loose ends.
The ENO Atlas XL Suspension Straps provide 40 attachment points and are crafted with reinforced triple stitching, making them a solid reference for what high‑quality seams should look like. Price: $39.95, Rating: 4.9/5 (1,239 reviews).
If you detect any thread that pulls out easily, the strap’s load‑bearing capacity is likely reduced. Replace the strap before it fails under weight.
Step 6 – Evaluate Environmental Exposure Effects
UV radiation, moisture, and temperature fluctuations can degrade polyester over time. Look for fading, stiffening, or a powdery residue that indicates polymer breakdown.
All five recommended straps are engineered for outdoor resilience, but the ENO Atlas Suspension Straps specifically mention eco‑friendly materials that resist UV‑induced brittleness. Regularly cleaning the straps with a mild soap solution and allowing them to air‑dry can mitigate these effects.
Store straps in a dry, shaded pouch when not in use; the included carry bags for MalloMe and Foxelli models are convenient for this purpose.
Step 7 – Document Findings and Establish a Replacement Schedule
After completing the inspection, record the date, observed wear locations, and any load‑test results in a field notebook or digital app. This log helps you track progressive degradation and plan timely replacements.
Prioritize replacing straps that show any combination of visual damage, compromised stitching, or reduced load performance. A good rule of thumb is to retire a strap after 500 hours of cumulative use or when it has endured three or more load‑test cycles at 75 % capacity.
By maintaining a disciplined inspection routine, you safeguard yourself, your companions, and the natural environment.
Tips & Pro Tips
- Carry a small pocket knife to trim frayed edges before they expand.
- Use a silicone‑based spray on the strap surface to repel water without affecting breathability.
- When hanging in high‑altitude or windy locations, add a secondary safety line using a spare strap.
- Rotate the attachment loops regularly to distribute wear evenly across the strap length.
- Never exceed the manufacturer’s rated weight; overloading accelerates fiber fatigue.
Troubleshooting
Problem: The strap slips under load even though it appears intact.
Solution: Check that the loops are correctly threaded through the daisy‑chain and that the carabiner gate is fully closed. If slipping persists, the inner webbing may have stretched; replace the strap.
Problem: Excessive bark damage after a night’s sleep.
Solution: Switch to a wider, tree‑friendly strap such as the Foxelli XL Hammock Straps and add a protective tree sleeve.
Conclusion
Predicting hammock suspension wear patterns requires a systematic approach that combines visual checks, load testing, and environmental awareness. By following the seven steps outlined above, readers can identify early signs of deterioration, prevent dangerous failures, and extend the lifespan of their suspension gear. Regular documentation and proactive replacement ensure that every hammock outing remains safe, comfortable, and environmentally responsible.
Products Mentioned in This Guide
Frequently Asked Questions
What are the most common wear patterns in hammock suspension straps?
Typical wear includes fraying at attachment points, abrasion from rubbing against trees, and thinning where the strap bends under load.
How often should I perform the 7‑step inspection on my hammock suspension?
Inspect before each trip and do a thorough check at least once a month if the gear is stored long‑term.
Can I use a household scale to test the load capacity of my suspension straps?
Yes, a lightweight scale can verify that straps hold the recommended weight, but also apply a real‑world test load with a backpack for accuracy.
What tools help detect hidden damage in suspension lines?
A soft brush to clear debris, a magnifying glass or flashlight to spot micro‑tears, and a tension gauge for checking stretch are useful.
How can I extend the lifespan of my hammock suspension system?
Regular cleaning, rotating attachment points, avoiding sharp edges, and promptly repairing or replacing worn sections will keep the system safe longer.