How to Design a Hammock Campsite Lighting Layout for Groups — Step‑by‑Step Guide to Safety, Comfort & Ambience
Introduction
This guide will teach readers how to plan and install a lighting system that enhances safety, comfort, and ambience for a group hammock campsite. One will discover how to balance functional illumination with decorative mood lighting, while respecting power constraints and weather conditions. The information is valuable because proper lighting reduces accidents, extends usable hours after dark, and creates a memorable outdoor experience. By following the steps, one can achieve a professional‑grade setup without extensive electrical expertise.
What You'll Need
- Primary lighting sources (rechargeable lanterns or battery‑powered lights)
- Ambient string lights for decorative glow
- Solar or USB charging solutions
- Mounting hardware such as hooks, magnets, and zip ties
- Spare batteries or power banks for emergencies
- Basic tools: scissors, screwdriver, and a small hammer
Below are recommended products that satisfy these requirements. Links point to Amazon listings with affiliate codes.
Step 1: Plan the Layout
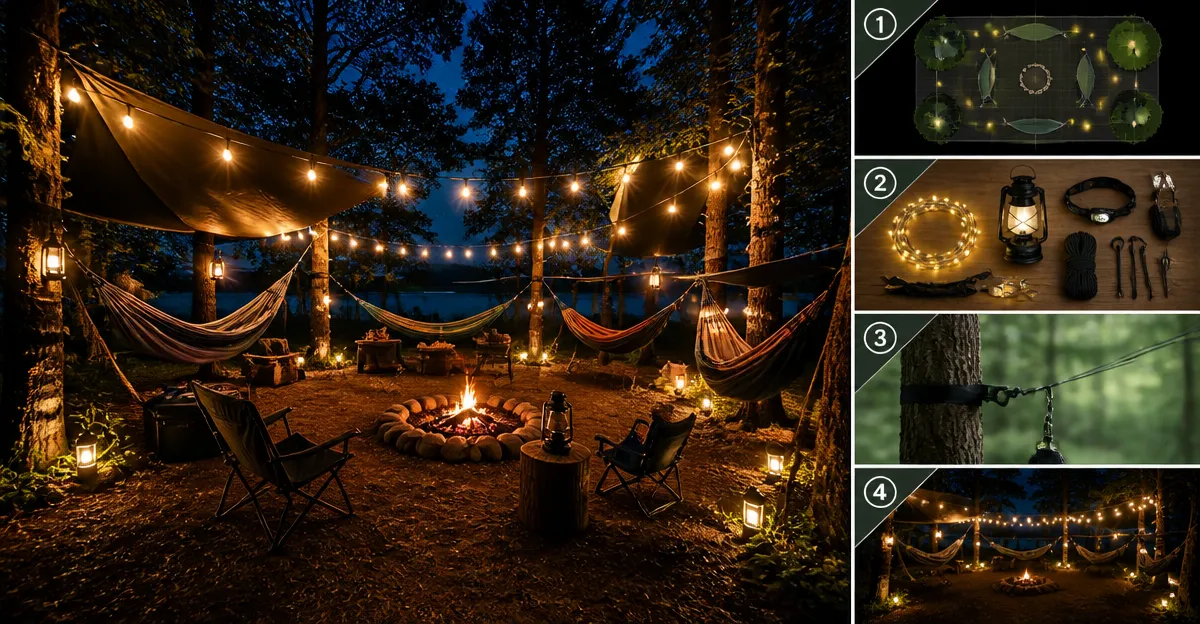
Begin by sketching the campsite on paper or a tablet. Mark the positions of hammocks, communal seating, and pathways. One should allocate a central “core” zone for primary lighting, and a peripheral ring for ambient string lights. Consider the direction of prevailing winds to avoid smoke or ember drift toward the lights. This planning stage ensures that cables and batteries are placed out of high‑traffic areas, reducing tripping hazards.
When the sketch is complete, identify anchor points such as tree branches, tent poles, or portable frames. These points will hold the lights described in later steps. Using a systematic layout prevents overcrowding and makes future adjustments easier.
Step 2: Choose a Power Source
Select a reliable power source that matches the group's duration and environmental conditions. For short weekend trips, rechargeable lanterns are convenient; for extended stays, solar‑charged units provide sustainability.
For primary illumination, the Lichamp LED Camping Lantern is an excellent choice. It offers 30 energy‑efficient LEDs delivering 350 lumens and 360° coverage, runs on three AA batteries, and is water‑resistant. Priced at $24.99 with a 4.7‑star rating from 10,772 reviews, it balances brightness and portability. The lantern's collapsible handles allow hanging from tree limbs, and its simple pull‑up activation eliminates the need for switches.
Alternatively, the XTAUTO Solar USB Camping Lantern provides solar charging and a built‑in 1600 mAh battery. At $29.99 and a 4.5‑star rating, it supplies up to 25 hours of light on a full charge and includes a USB port for charging other devices. Its dual charging methods make it resilient in cloudy weather.
For groups that require longer runtime, consider using multiple lanterns in a staggered rotation to extend illumination without sacrificing brightness.
Step 3: Install Primary Lighting
Place the primary lanterns in the central core zone identified during planning. Hang each lantern from a sturdy branch using the built‑in handles or attach a magnetic base if the surface is metal. The OGERY Camping String Lights also function as a work light when the XTE strong light mode is activated, providing focused illumination for setting up the campsite.
Secure the lanterns at a height of 6‑8 feet to distribute light evenly while keeping the fixtures out of reach of children and pets. Use zip ties or rope to fasten the cords, ensuring they do not sag into walking paths. Verify that each lantern's battery indicator shows a full charge before final placement.
For emergency scenarios, the Glocusent LED Camping Lantern offers a 1500 lumens super‑bright mode and an SOS red strobe. Priced at $25.99 with a 4.7‑star rating, it can serve as a backup beacon if primary lights fail.
Step 4: Add Ambient String Lights
Ambient lighting creates a relaxed atmosphere for evening conversations. Drape the OGERY Camping String Lights along the perimeter of the hammock area, wrapping them around tree trunks, tent poles, or a portable frame. These lights feature eight modes, including warm white, RGB breathing, and SOS flashing, allowing one to customize the mood.
Because the OGERY lights are only 7.4 oz and fold into a 32.8‑ft strand, they are easy to transport and set up in under a minute. The built‑in 2000 mAh battery provides 5‑12 hours of runtime, depending on the selected mode. Use the USB charging cable supplied to recharge the lights overnight.
If a solar‑powered option is preferred, the addlon Solar String Lights deliver up to 20+ hours of illumination after eight hours of sunlight. They include a remote control with brightness and timing settings, enabling one to program the lights to dim automatically after a set period.
Step 5: Set Up Safety Lighting
Safety lighting should illuminate walkways, fire pits, and exit routes. Use the Lichamp LED Camping Lantern in “XTE weak light” mode or the Glocusent lantern on low brightness to create a gentle guide path. Position these lights at intervals of 5‑6 feet along the main trail.
Attach small magnetic bases or suction cups to the lanterns if the campsite includes metal surfaces or smooth rocks. This prevents accidental tipping. Ensure that the safety lights are switched on before darkness falls to allow campers to navigate safely.
In case of sudden weather changes, the waterproof rating of the Lichamp lantern (military‑grade plastic) and the IP44 rating of the Glocusent lantern guarantee continued operation in rain.
Step 6: Test and Adjust
After installation, conduct a walk‑through test. Verify that each lantern provides adequate coverage and that the string lights do not create glare on the hammocks. Adjust the orientation of the primary lanterns by rotating the handle or changing the mode to achieve the desired balance between brightness and ambience.
Check battery levels on all devices. If any lantern shows a low‑battery indicator, replace or recharge the batteries before the group settles for the night. Record the runtime of each lighting mode to plan future charging cycles.
Finally, solicit feedback from the group. Small adjustments, such as moving a string light closer to a seating area or dimming the ambient glow, can greatly improve comfort.
Tips & Pro Tips
- Use a portable power bank (10,000 mAh or higher) as a backup for lanterns that run on AA batteries.
- Wrap cords with electrical tape to protect against abrasion and moisture.
- When using solar lights, place the solar panel in direct sunlight for at least eight hours each day for optimal charge.
- Consider adding a small reflective tarp beneath the hammock area to bounce light and reduce the number of lanterns needed.
- Never leave rechargeable lights unattended while charging; the built‑in indicator on the OGERY lights flashes blue to confirm proper charging.
Troubleshooting
Problem: Lantern does not turn on after charging.
Solution: Verify that the correct charging cable is used (OGERY lights require the original cable). Check battery contacts for corrosion and clean with a dry cloth.
Problem: String lights flicker or dim unexpectedly.
Solution: Ensure the battery is fully charged; switch to a lower‑power mode if runtime is limited. Replace the battery if the indicator shows a fault.
Problem: Solar lights fail to charge on cloudy days.
Solution: Use the USB charging option on the addlon lights to top up the battery manually.
Conclusion
Designing a hammock campsite lighting layout for groups involves careful planning, selection of reliable power sources, and strategic placement of both functional and decorative lights. By following the six steps outlined above, one can create a safe, comfortable, and inviting environment that extends enjoyment after sunset. The recommended products—OGERY Camping String Lights, Lichamp LED Camping Lantern, XTAUTO Solar USB Camping Lantern, Glocusent LED Camping Lantern, and addlon Solar String Lights—provide versatile solutions for a range of lighting needs. Implement the tips, test the system, and adjust as necessary to ensure a memorable outdoor experience.
Products Mentioned in This Guide
Frequently Asked Questions
What type of lighting is best for safety at a hammock campsite?
Use rechargeable lanterns or battery‑powered floodlights that provide bright, even illumination over the sleeping area.
How can I add ambient mood lighting without draining power?
String LED lights powered by a small solar panel or USB power bank give a decorative glow with minimal energy use.
What mounting options work for hanging lights in a hammock camp?
Hooks, magnetic clips, and zip ties securely attach lights to trees or poles without damaging the bark.
How many spare batteries should I bring for a group campsite?
Carry at least two extra rechargeable batteries or a power bank per lighting set to cover unexpected delays.
Can I set up a lighting layout in wet weather?
Choose weather‑rated, waterproof lights and seal connections with silicone tape to protect against rain and humidity.