Ultimate Guide to Hammock Camping for High-Altitude Photographers: Essential Gear, Safety Tips & Shooting Techniques
Introduction
High‑altitude photography offers unparalleled vistas, but reaching those peaks often requires lightweight, efficient shelter. This guide explains how photographers can combine hammock camping with mountaineering fundamentals to stay safe, comfortable, and ready to shoot. Readers will learn essential gear selections, safety protocols, and photographic techniques that maximize image quality while minimizing pack weight.
The article also integrates two highly‑rated Kindle resources that provide deeper context on hiking preparation and hammock‑specific strategies. By the end of the guide, one will be equipped to plan, execute, and document a successful high‑altitude hammock adventure.
Background/Context
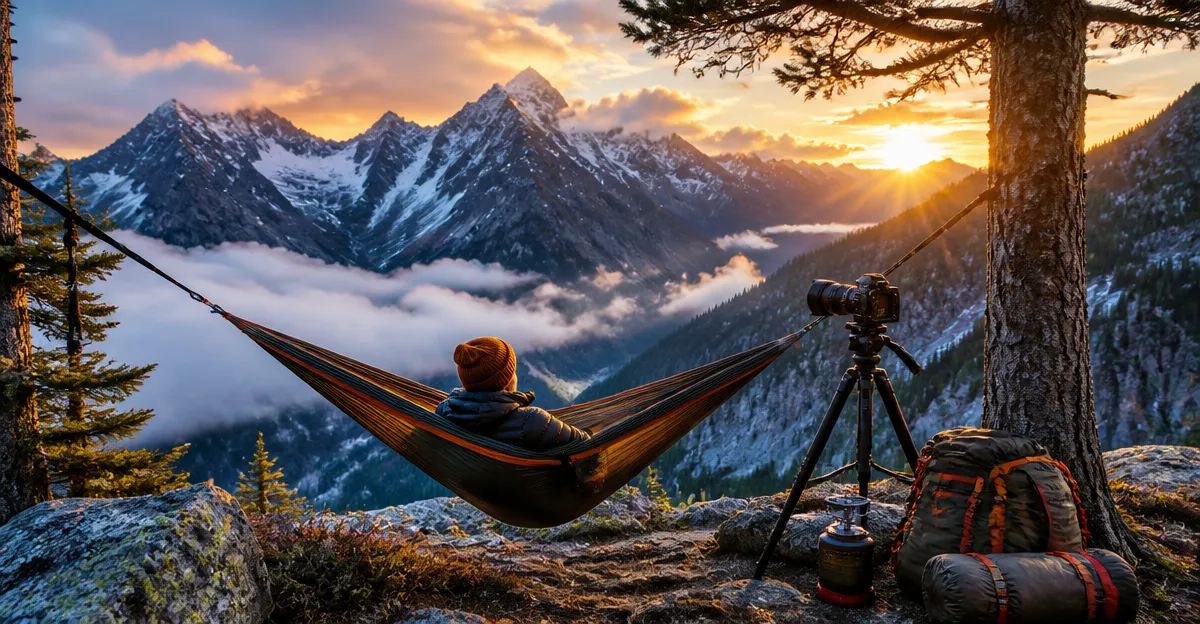
Hammock camping originated as a lightweight alternative to traditional tents, especially popular among ultralight backpackers. At high elevations, temperature swings, wind exposure, and limited shelter options make a well‑chosen hammock system invaluable. Photographers must also consider equipment protection, stability for tripod mounting, and rapid deployment to capture fleeting light.
Fundamental knowledge includes altitude acclimatization, weather pattern awareness, and Leave No Trace principles. Understanding these concepts reduces risk and preserves the pristine environments that inspire alpine photography.
Understanding High‑Altitude Hammock Camping
High‑altitude hammock camping differs from low‑elevation use in three primary ways: thermal management, wind resistance, and load distribution. At elevations above 3,000 meters, ambient temperatures can drop below freezing even in summer, requiring insulated under‑quilts and reflective tarps.
Wind can create oscillation that destabilizes both the camper and camera gear. Selecting a hammock with a low‑profile design and employing a sturdy ridge line reduces sway. Load distribution is critical because a photographer’s gear often exceeds the weight of a typical backpacker; a hammock rated for at least 30 kg provides a safety margin.
For a comprehensive overview of hiking preparation, readers may consult Ultimate Hiking & Camping Guide, which covers altitude acclimatization, nutrition, and route planning.
Essential Gear for Photographers
Choosing gear that balances weight, durability, and functionality is essential. The following list prioritizes items that directly support hammock camping and photographic workflow:
- Hammock System: A 10‑ft double‑wide hammock made from ripstop nylon, rated for 30 kg, with reinforced loops for tree attachment.
- Under‑Quilt: Down or synthetic insulation rated for -10 °C, with a snug fit to prevent cold air circulation.
- Rainfly/Tarp: A double‑layer tarp with a built‑in bug net, featuring grommets for adjustable tension.
- Tree Protection: Adjustable webbing or tree straps to avoid bark damage and distribute load.
- Camera Support: A lightweight tripod with a low center of gravity, such as carbon‑fiber models, and a quick‑release plate that clips onto the hammock’s suspension line.
- Power Management: Portable solar panels and high‑capacity lithium batteries to keep cameras operational during long daylight hours.
For hammock‑specific instruction, the First‑Timer's Hammock Camping Guide offers step‑by‑step setup, tree‑selection tips, and safety checklists.
Safety Strategies at Elevation
Safety at altitude begins with proper acclimatization. Ascend no more than 300 m per day after the initial 1,000 m, and incorporate rest days every 3–4 days. Hydration is critical; aim for 3–4 L of water daily, supplemented with electrolytes.
When setting up a hammock, verify that each anchor point can support at least twice the combined weight of the camper and gear. Use a load‑testing strap and inspect trees for cracks or rot.
In case of sudden weather changes, the rainfly should be deployed before the first drops appear. A reflective emergency blanket tucked into the under‑quilt provides an additional thermal layer.
Emergency communication devices such as a satellite messenger or personal locator beacon (PLB) are advisable for remote alpine zones. Always inform a trusted contact of the intended route and estimated return time.
Shooting Techniques for Alpine Landscapes
Capturing high‑altitude scenes requires both technical proficiency and adaptability. Consider the following techniques:
- Golden Hour Utilization: Position the hammock near a clear horizon to exploit soft, directional light during sunrise and sunset.
- Long Exposure Stabilization: Use a tripod anchored to the hammock’s suspension lines with sandbags or weighted backpacks to minimize vibration.
- High ISO Management: Modern sensors handle ISO 1600–3200 well; however, keep noise low by using noise‑reduction software in post‑processing.
- Composition with Scale: Include foreground elements such as the hammock or climbing gear to convey the vastness of the surrounding peaks.
- Weather Adaptation: Cloud formations can add drama; monitor barometric trends and be ready to shoot during rapid weather shifts.
Both recommended books discuss the importance of planning shots around environmental conditions. The hiking guide emphasizes route scouting, while the hammock guide highlights rapid deployment for spontaneous lighting opportunities.
Comparison/Selection Guide
When choosing a reference book, consider the following criteria:
| Feature | Ultimate Hiking & Camping Guide | First‑Timer's Hammock Camping Guide |
|---|---|---|
| Primary Focus | Comprehensive hiking, camping, and backpacking preparation | Step‑by‑step hammock setup and safety |
| Length (pages) | ~250 | ~120 |
| Price | $2.99 | $2.99 |
| Rating | 4.3/5 (17 reviews) | 5/5 (1 review) |
| Best For | Photographers needing broader expedition planning | Beginners focusing on hammock techniques |
If one seeks a holistic understanding of altitude logistics, the hiking guide is the better choice. For immediate hammock‑specific advice, the hammock guide excels with a perfect rating and concise format.
Best Practices & Tips
- Test all gear at home before heading to altitude; simulate wind by using a fan.
- Pack a lightweight, packable bivy sack as a backup shelter in case the hammock fails.
- Calibrate your camera’s white balance for high‑altitude lighting; the blue tint of thin air can affect color accuracy.
- Use a microfiber cloth to keep lenses free of snow and dust; moisture can condense on optics during rapid temperature changes.
- Maintain a low center of gravity when moving inside the hammock to prevent tipping.
Frequently Asked Questions
- Can I use a regular tent at high altitude instead of a hammock?
- While tents provide more enclosed protection, they add significant weight and can be cumbersome on steep terrain. Hammocks offer superior ventilation and quicker setup, which is advantageous for photographers who need to react swiftly to lighting changes.
- How do I protect my camera from cold temperatures?
- Store the camera in an insulated sleeve when not in use, and keep spare batteries warm inside an inner pocket. Cold reduces battery capacity dramatically.
- What is the ideal tree spacing for a hammock at altitude?
- Spacing between 9 and 12 feet works for most double‑wide hammocks. Ensure both trees are healthy and have a diameter of at least 4 inches to support the load.
- Do I need a separate rainfly if I have a waterproof tarp?
- A waterproof tarp with a built‑in bug net can serve as both rain protection and insect barrier, eliminating the need for a separate rainfly.
- Is it safe to set up a hammock on snow?
- Yes, by using snow stakes or burying the hammock’s suspension lines in packed snow, you can create a stable anchor system without damaging vegetation.
Conclusion
High‑altitude hammock camping merges the freedom of lightweight shelter with the creative possibilities of alpine photography. By mastering gear selection, safety protocols, and shooting techniques, one can capture breathtaking images while remaining comfortable and secure. The referenced guides provide additional depth, ensuring that both novice and experienced photographers are prepared for the challenges of the mountains.
Products Featured in This Guide
Ultimate Hiking & Camping Guide
Price: $2.99
Rating: 4.3/5 (17 reviews)
Featured because it delivers comprehensive preparation advice for altitude acclimatization, route planning, and essential backpacking skills that underpin successful hammock camping expeditions.
First‑Timer's Hammock Camping Guide
Price: $2.99
Rating: 5/5 (1 review)
Featured because it provides clear, step‑by‑step instructions for hammock selection, setup, and safety—critical knowledge for photographers operating in high‑altitude environments.
Frequently Asked Questions
What lightweight hammock setup is best for high‑altitude photography?
Choose a double‑ripple or spreader‑bar hammock with aluminum straps, a tarp with a built‑in bug net, and ultralight aluminum or carbon poles for wind resistance.
How can I protect camera gear from cold and moisture while hammock camping?
Store cameras in insulated waterproof dry sacks, use silica gel packs, and keep them close to your body inside the hammock for added warmth.
What safety measures should I follow when setting up a hammock at high elevations?
Anchor to solid trees or rock‑spikes, use a 3‑point suspension for stability, and always check for wind direction and load limits before sleeping.
Which tarp design offers the best balance of coverage and weight for mountain hammocks?
A hexagonal or diamond‑shaped tarp with a built‑in rainfly and adjustable guylines provides full protection while staying under 300 g.
How can I improve photo composition when shooting from a hammock?
Use a low‑angle perspective, incorporate the surrounding landscape for depth, and employ a remote trigger or timer to avoid camera shake.