How to Integrate Solar Panels with Your Hammock Setup: Step‑by‑Step DIY Mounting, Wiring & Charging for Off‑Grid Camping
Introduction
One can transform a simple hammock retreat into a self‑sufficient oasis by adding solar power. This guide explains how to select, mount, and wire solar panels so that a hammock camp can generate electricity for lighting, device charging, and small appliances. The reader will learn how to evaluate site conditions, choose appropriate panels, and create a safe, weather‑proof system that works even in remote locations.
Integrating solar panels with a hammock offers several advantages. First, the elevated position of a hammock often provides unobstructed exposure to sunlight, which maximises energy capture. Second, a lightweight, portable solar solution reduces the need for noisy generators, preserving the serenity of the outdoor experience. Finally, the knowledge gained can be applied to any off‑grid adventure, from backpacking to overlanding.
The instructions below are written for an intermediate audience that is comfortable with basic hand tools and electrical safety. No professional electrician is required, but the guide stresses compliance with local codes and the use of certified components.
By the end of this article, the reader will have a fully functional solar‑powered hammock setup ready for weekend getaways or extended expeditions.
What You’ll Need
- Solar panel(s) suitable for the desired power output (see product recommendations).
- Mounting brackets or adjustable straps compatible with hammock trees or poles.
- Weather‑proof wiring, MC4 connectors, and a charge controller.
- Battery bank or power station to store harvested energy.
- Tools: drill, wrench set, multimeter, and cable ties.
- Safety gear: insulated gloves and eye protection.
All of the above items can be sourced from reputable outdoor or solar retailers. The following sections integrate specific Amazon products that simplify each step.
Step 1: Assess Sunlight Availability and Power Requirements
Before purchasing any panel, it is essential to estimate daily energy consumption. A typical hammock camp may require 10‑20 Wh for LED lighting, a smartphone charger, and a small fan. Multiply the wattage by the expected hours of use to obtain the required watt‑hours. For example, a 10 W LED lamp used for 5 hours consumes 50 Wh.
Next, evaluate the campsite orientation. Trees that provide shade in the afternoon may reduce output, while an open clearing offers the best results. Use a solar path calculator or a simple sun‑tracking app to verify that the panel will receive at least four hours of peak sun each day.
Having quantified the energy need, select a panel that can produce at least 1.5 times the required watt‑hours to account for inefficiencies. For a 50 Wh daily load, a 100 W panel is a comfortable choice.
For campers who desire a versatile, high‑output solution, the ECO‑WORTHY Solar Panel Kit provides two 100 W monocrystalline panels, a 30 A PWM charge controller, and mounting hardware. The kit’s 800 Wh daily output under optimal conditions comfortably exceeds most hammock‑camp power budgets.
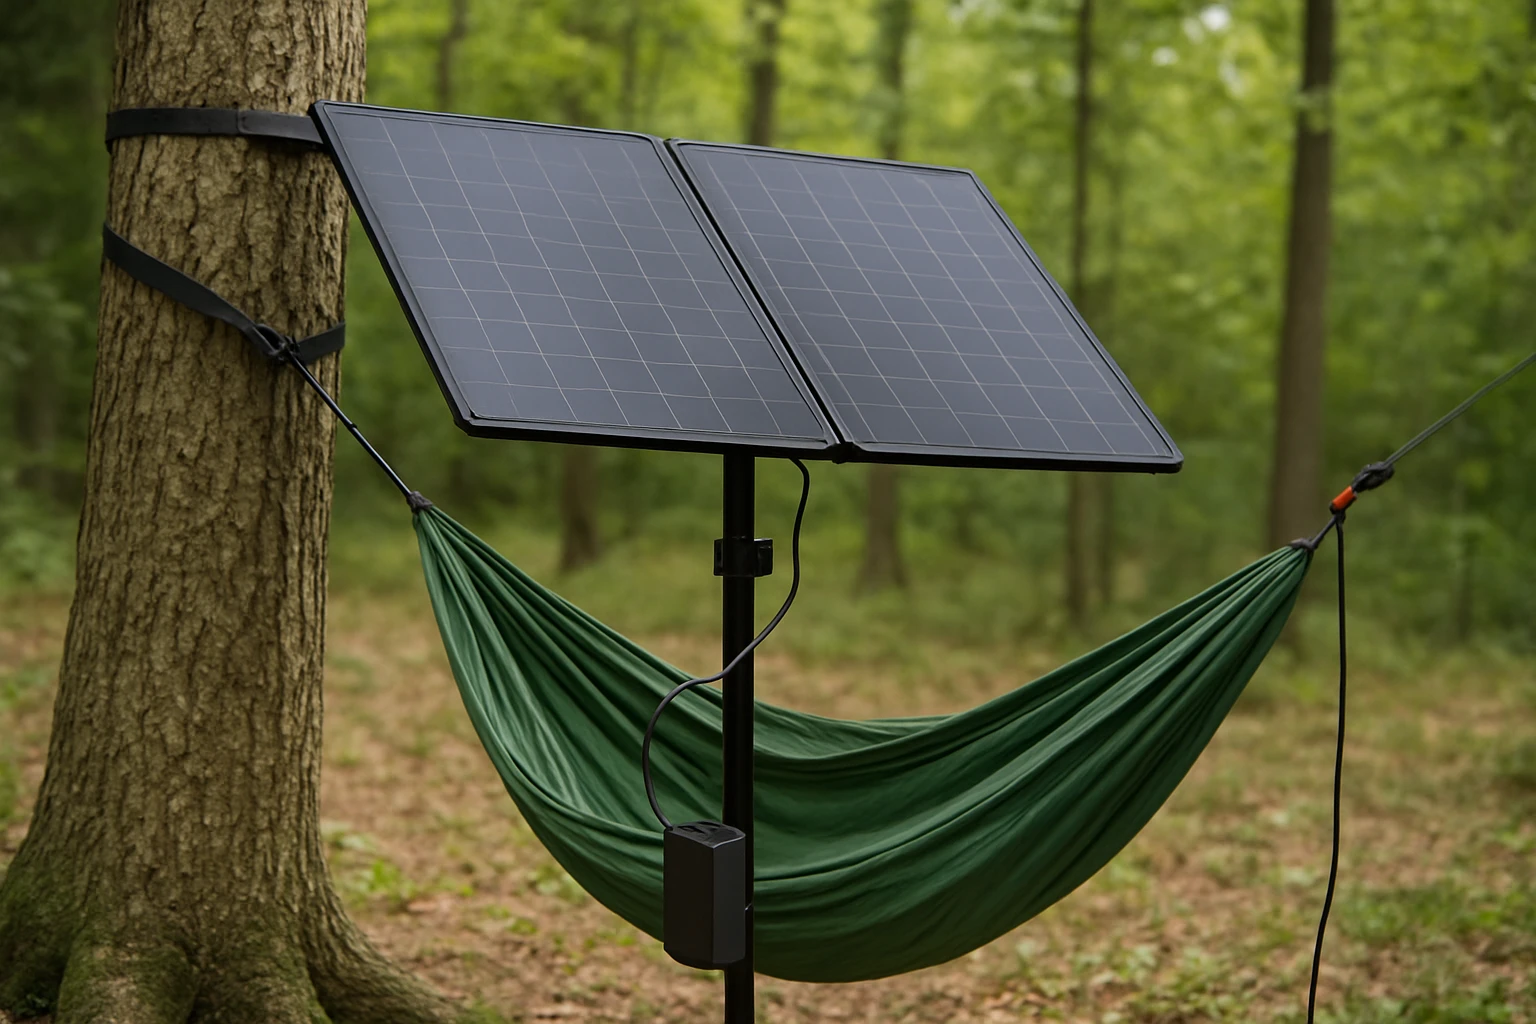
Step 2: Choose the Appropriate Mounting Method
The hammock’s suspension points—typically two trees or sturdy poles—must also support the solar panel without compromising safety. Two common approaches are:
- Rigid brackets that attach to the tree trunks using bolts or straps.
- Adjustable canvas straps that wrap around the trunks and hold the panel in a cantilever position.
For a permanent‑like installation, the Z‑mounting brackets included in the ECO‑WORTHY kit are ideal. They are made of corrosion‑resistant aluminum, can withstand wind speeds up to 2400 Pa, and feature pre‑drilled holes for quick attachment. The brackets allow the panels to be oriented at the optimal tilt angle (approximately 30°) to maximise solar incidence.
For a lightweight, temporary setup, the ZOUPW Foldable Solar Charger includes two adjustable kickstands that can be positioned on a nearby rock or a low branch. Its compact 100 W panel folds to a size that can be carried in a backpack, making it perfect for hikers who set up a hammock only for a night or two.
When using the ZOUPW panel, secure the kickstands with rope or paracord to prevent movement in windy conditions. Verify that the panel’s surface is free of debris before each use.
Step 3: Install the Charge Controller
The charge controller regulates voltage and current from the solar panel to the battery, preventing over‑charging and extending battery life. A PWM (Pulse Width Modulation) controller is sufficient for small systems, while MPPT (Maximum Power Point Tracking) controllers are more efficient for larger arrays.
The ECO‑WORTHY kit includes a 30 A PWM charge controller rated for 12 V/24 V systems. Its IP65‑rated junction box protects the electronics from rain and dust, a crucial feature for an outdoor hammock environment. Connect the panel’s positive and negative leads to the controller’s input terminals, then connect the battery bank to the output terminals following the colour‑coded wiring diagram.
For users who prefer a compact, all‑in‑one solution, the GRECELL Portable Solar Panel incorporates a built‑in charge controller and a 4‑in‑1 cable that can directly charge most power stations. This eliminates the need for a separate controller, reducing weight and simplifying wiring.
Regardless of the controller type, always verify polarity with a multimeter before connecting to the battery. Incorrect polarity can damage the controller and the battery.
Step 4: Wire the System Safely
Use solar‑rated 10 AWG cable for connections between the panel and the charge controller, as supplied in the ECO‑WORTHY kit. The cable should be long enough to reach the mounting location without tension, but as short as practicable to minimise voltage drop.
Secure the cable with UV‑resistant zip ties every 12‑18 inches. Route the wiring along the tree trunk or a protective conduit to avoid abrasion from branches or wildlife. If the cable must cross a walking path, use a conduit with a protective cover.
For the GRECELL panel, the supplied 4‑in‑1 cable includes MC4 connectors that snap onto the panel’s output and the power station’s input. This plug‑and‑play design reduces the risk of loose connections and is especially useful for campers who frequently relocate.
After all connections are made, double‑check that the system is grounded. Many charge controllers have a grounding lug; connect a grounding rod or attach to a metal tree trunk using a copper strap.
Step 5: Connect to a Battery Bank or Power Station
A lithium‑ion power station such as the Jackery Explorer or EcoFlow Delta provides a convenient storage solution. The battery bank should have a capacity of at least twice the daily energy consumption to allow for cloudy days.
If using the ZOUPW panel, the built‑in intelligent controller offers three direct‑charging ports (USB‑C PD, USB‑A QC3.0). These ports can power smartphones, GPS units, or LED lights without a separate power station, making the system ideal for lightweight backpacking.
When connecting the ECO‑WORTHY kit to a larger battery bank, use the controller’s DC output terminals and match the voltage (12 V or 24 V) to the battery’s specifications. Secure the battery in a weather‑proof enclosure if it will remain on the ground.
Once the battery is linked, monitor the state of charge via the controller’s LCD display. Many controllers provide real‑time voltage, current, and charging status, enabling the user to optimise panel orientation throughout the day.
Step 6: Optimize Panel Tilt and Orientation
Solar panels generate the most power when positioned perpendicular to the sun’s rays. In the northern hemisphere, a tilt angle equal to the latitude provides year‑round efficiency. For a hammock camp, a fixed tilt of 30° to 45° is usually sufficient.
The Callsun Bifacial Solar Panel excels in low‑light and reflective environments. Its bifacial design captures sunlight from both the front and rear surfaces, increasing output by up to 30 % when placed over light‑colored ground such as sand or snow. The panel’s dual‑module parallel architecture also mitigates power loss when part of the panel is shaded by a tree branch.
Install the Callsun panel using the Z‑mount brackets from the ECO‑WORTHY kit, or attach its built‑in pre‑drilled holes to a sturdy pole. Ensure the back side remains exposed to reflected light; a light‑colored tarp or reflective blanket underneath can enhance bifacial performance.
Periodically adjust the panel’s angle throughout the day to follow the sun’s trajectory. Small adjustments of 5° can increase daily output by several percent, especially during early morning or late afternoon.
Tips & Pro Tips
- Use a sun‑tracking app: Real‑time data helps you fine‑tune tilt angles and anticipate cloud cover.
- Protect connectors with heat‑shrink tubing: This prevents moisture ingress and corrosion.
- Employ a fuse: Place a 10 A inline fuse between the panel and controller to safeguard against short circuits.
- Keep panels clean: Dust and bird droppings can reduce efficiency by up to 15 %.
- Consider a portable battery monitor: Devices such as the Victron BMV‑712 provide detailed charge statistics.
- Use reflective ground mats: For bifacial panels, a white or metallic surface beneath the panel boosts rear‑side illumination.
Troubleshooting
Problem: Battery does not charge.
Solution: Verify that the panel is receiving adequate sunlight, check all connections for polarity, and confirm that the charge controller is set to the correct battery voltage. Use a multimeter to measure panel voltage; it should be around 18 V for a 12 V system under load.
Problem: Intermittent power loss when a branch shades part of the panel.
Solution: Switch to the Callsun Bifacial panel, which tolerates partial shading, or re‑orient the panel to avoid the shaded area. The dual‑module design allows the unshaded half to continue producing power.
Problem: Wiring overheats during prolonged sun exposure.
Solution: Ensure cable gauge is appropriate for the current (10 AWG for up to 30 A) and that cables are not bundled tightly. Provide ventilation or use heat‑resistant conduit.
Conclusion
Integrating solar panels with a hammock setup transforms a simple retreat into a self‑sustaining campsite. By assessing sunlight, selecting the right panel, mounting securely, wiring safely, and optimising tilt, one can reliably generate electricity for lighting, communication, and small appliances. The recommended products—ECO‑WORTHY Solar Panel Kit, Callsun Bifacial Solar Panel, GRECELL Portable Solar Panel, and ZOUPW Foldable Solar Charger—cover a range of power needs and portability preferences, ensuring that both novice and seasoned campers can implement a robust off‑grid solution.
With the knowledge gained from this guide, the reader can enjoy the serenity of a hammock while staying connected and powered, regardless of location.
Products Mentioned in This Guide
Frequently Asked Questions
What kind of solar panel is best for a hammock camping setup?
A lightweight, foldable 10‑20 W monocrystalline panel offers high efficiency and easy portability for hammock use.
How can I securely mount a solar panel to my hammock frame?
Use adjustable strap brackets or Velcro‑fastened clamps that wrap around the frame poles, allowing tilt adjustment toward the sun.
What wiring and connectors do I need for safe off‑grid charging?
Connect the panel to a small MPPT charge controller with MC4 connectors, then run gauge‑appropriate wire to a 12 V battery or USB power bank.
How do I protect the solar system from weather and moisture?
Seal all connections with waterproof tape, use a weather‑proof enclosure for the controller, and angle the panel to shed rain.
How much power can I realistically generate to charge devices while hammock camping?
A 15 W panel can produce 60‑90 Wh per day in full sun, enough to charge a phone 2‑3 times and run an LED light.