Introduction
In this guide the reader will learn how to combine multiple underquilts, adjust tension, and manage heat loss so that a hammock remains comfortable when ambient temperatures fall below 0°F. The process requires careful selection of insulation, proper attachment techniques and an understanding of how wind, moisture and body heat interact in a suspended sleeping system. By following the step‑by‑step instructions the reader will be able to construct a reliable subzero sleeping envelope without excessive weight or complexity. The information is valuable for backpackers, winter campers and anyone who wishes to enjoy the freedom of hammock sleeping in extreme cold.
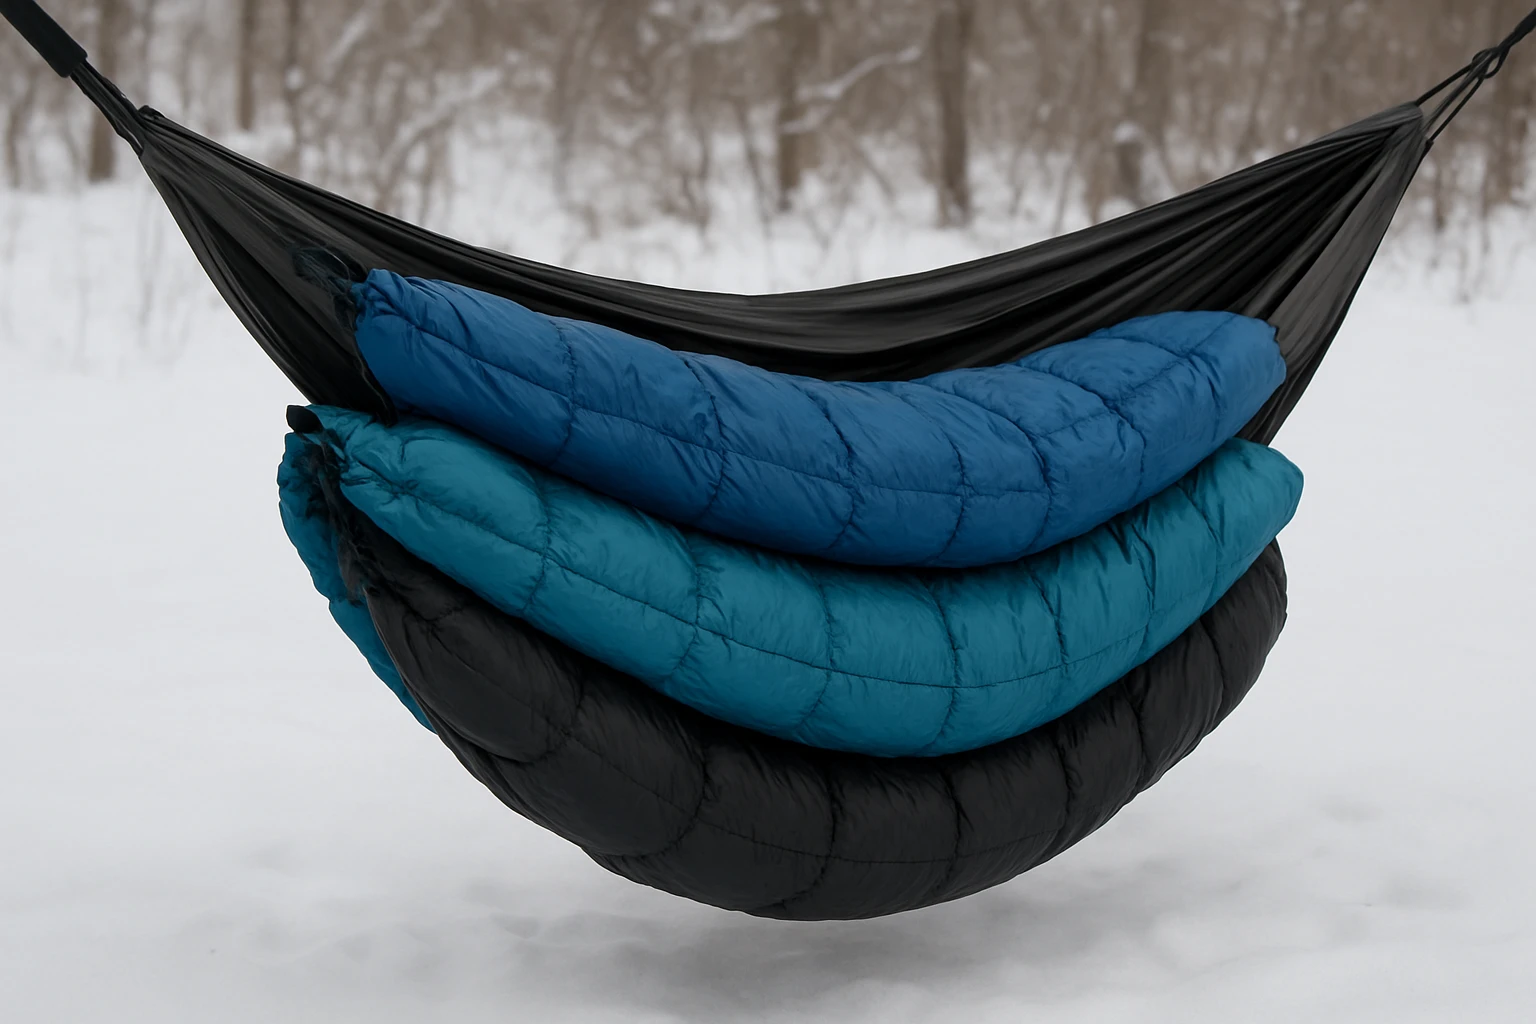
What You’ll Need
- Primary underquilt (e.g., ENO Ember Underquilt)
- Secondary underquilt or supplemental insulation (e.g., onewind Double Underquilt)
- Lightweight underquilt for backup warmth (e.g., OneTigris Hideout Underquilt)
- Heavy‑duty winter underquilt for extreme lows (e.g., HIKERBRO 4 Season Underquilt)
- Compression sacks, carabiners, adjustable cord ties, and a reliable hammock suspension system
- Thermal sleeping bag or liner, insulated ground tarp (optional for added wind protection)
Step 1: Assess Weather, Choose Base Layer, and Prepare the Hammock
The first action is to verify the forecast, noting wind chill, precipitation probability and the lowest expected temperature. A base layer consisting of a moisture‑wicking long‑sleeve shirt, lightweight fleece and a down or synthetic sleeping bag creates a dry skin surface that reduces conductive heat loss. The hammock itself should be made of breathable yet strong material; nylon or polyester hammocks with a 30‑to‑35 % stretch ratio allow the underquilt to sit snugly without excessive sag. Secure the suspension lines with tree‑friendly straps, ensuring that the hammock hangs at a 30‑degree angle for optimal airflow and comfort.
Step 2: Install the Primary Underquilt
Attach the primary insulation layer to the hammock using the cords or carabiners supplied with the underquilt. The ENO Ember Underquilt is an excellent choice for this step because its recycled synthetic insulation provides a comfort zone of 40‑60 °F and its water‑repellent finish shields against snow and drizzle. At $115.64 and a 4.8‑star rating from 90 reviewers, the Ember Underquilt balances warmth, durability and eco‑friendly design. Clip the underquilt’s attachment points around the hammock straps, then pull the cords until the quilt forms a tight envelope around the sleeping zone, eliminating cold spots on the sides and bottom.
Step 3: Add a Secondary Insulation Layer for Subzero Conditions
When temperatures dip below the comfort range of the primary quilt, a secondary underquilt adds the necessary thermal mass. The onewind Double Underquilt offers ultralight 20D recycled nylon fabric, bio‑based Sorona insulation and adjustable cord ends that permit precise tensioning. Priced at $72.99 with a 4.6‑star rating from 675 reviews, it delivers high loft without the bulk of down and resists moisture absorption. Position the double underquilt beneath the Ember Underquilt, aligning the adjustable cords so that the center of the quilt can be tightened around the sleeper’s hips and thighs, a technique commonly referred to as eliminating “cold butt syndrome.” This configuration creates a three‑layer system that retains heat even when ambient temperatures approach –20 °F.
Step 4: Incorporate a Lightweight Backup Underquilt for Versatility
For nights when the wind is mild but the temperature remains near the freezing point, a lightweight underquilt can be added or removed quickly. The OneTigris Hideout Underquilt weighs only 2 lb, measures 9.2 ft × 4 ft and is rated for 41 °F‑68 °F, making it suitable as a supplemental blanket on milder evenings. At $39.98 and a 4.6‑star rating from 2,116 reviewers, it provides an economical option for those who wish to reduce pack weight while retaining a safety margin. Clip its elastic straps to the hammock’s outer edges, then tuck the quilt’s edges under the primary layers to seal any remaining gaps. This step also allows the camper to transition from a three‑layer subzero setup to a two‑layer moderate‑cold arrangement without repacking the entire system.
Step 5: Deploy a Heavy‑Duty Winter Underquilt for Extreme Lows
If the forecast predicts temperatures below –10 °F, the heavy‑duty underquilt becomes essential. The HIKERBRO 4 Season Underquilt features 20D ripstop nylon, 300 g polyester wadding and a rating down to 14 °F, providing a robust thermal barrier against severe cold. Priced at $49.99 with a 4.6‑star rating from 84 reviews, it includes a compression bag that reduces its packed size to 1.25 ft × 0.66 ft, facilitating transport on long treks. Attach the HIKERBRO underquilt over the existing layers, using its built‑in hook and carabiners to lock the quilt in place. Tighten the long‑lasting tie ropes on both ends until the quilt fully encloses the hammock, then double‑check that the seams are aligned to prevent wind infiltration.
Step 6: Adjust Tension, Seal Gaps, and Optimize Ventilation
After all layers are in place, the final task is to fine‑tune tension on each cord system. Pull the cords evenly on both sides of each underquilt so that the fabric hugs the hammock without creating excessive pressure points that could damage the suspension lines. Use a small piece of duct tape or a weather‑proof sealant to cover any visible seams where wind might enter. If condensation becomes an issue, open a small vent at the top of the primary underquilt to allow moist air to escape while preserving overall warmth. The combination of layered insulation, proper tension and controlled ventilation ensures a comfortable micro‑climate inside the hammock even when the outside temperature drops below 0 °F.
Tips & Pro Tips
- Carry a small repair kit with nylon thread, a needle and fabric patches; even high‑quality underquilts can develop seam splits after repeated use.
- When setting up on windy nights, orient the hammock so that the opening faces away from the prevailing wind direction; this reduces the amount of cold air that can infiltrate the sleeping zone.
- Consider adding a lightweight bivy sack over the top of the underquilt system for additional windbreak; this can be especially useful in gusts exceeding 30 mph.
- Test the full layered configuration at home before heading into the backcountry; practice tightening and loosening the cords to develop muscle memory.
Troubleshooting
Problem: Persistent cold spots around the hips despite multiple underquilts. Solution: Verify that the cords of the secondary underquilt are tightened directly over the hips and that the primary quilt is not sagging away from the body. Adding a narrow, high‑loft sleeve made of fleece under the hips can also bridge any remaining gap.
Problem: Underquilt fabric becomes wet after light snow. Solution: Ensure the water‑repellent coating on the primary underquilt (e.g., ENO Ember Underquilt) is still active; reapply a DWR spray if necessary. Replace any saturated insulation with a dry backup layer such as the OneTigris Hideout Underquilt.
Conclusion
The reader now possesses a systematic approach to layering underquilts, selecting appropriate products and adjusting tension to remain warm below 0 °F while hammock camping. By integrating a primary synthetic underquilt, a secondary ultralight Sorona‑filled quilt, a lightweight backup blanket and a heavy‑duty winter underquilt, the camper creates a modular thermal envelope that can be adapted to a wide range of subzero conditions. Applying the tips, pro tips and troubleshooting steps will further enhance comfort and safety during extended winter excursions.
Products Mentioned in This Guide
Frequently Asked Questions
How do I attach multiple underquilts without creating gaps?
Use the same attachment points for each quilt and stagger the straps so the lower quilt slides inside the upper one, keeping the fabric taut and overlapping.
What is the optimal order for layering primary and secondary underquilts?
Place the higher‑R‑value primary underquilt closest to your body and add a lighter secondary quilt on top to trap additional air and reduce heat loss.
How can I adjust tension to prevent wind‑driven cold spots?
Tighten the suspension lines until the hammock sags slightly, then pull the underquilt straps snugly against the fabric to eliminate drafts while maintaining flexibility.
Will adding a lightweight backup underquilt add significant weight?
A thin, high‑loft backup quilt adds only a few ounces, providing extra warmth for sudden temperature drops without a noticeable weight penalty.
Can I use synthetic insulation instead of down for subzero hammock camping?
Yes, synthetic underquilts retain heat when damp and perform well in wet conditions, though they are bulkier than comparable down models.